The Complete Guide to Cultured Stone Maintenance
Introduction Cultured stone, also known as manufactured stone, provides an affordable and versatile alternative to natural stone for various construction projects. With see this here and durability, cultured stone has become a popular choice for homeowners and builders alike. However, like any other building material, cultured stone requires proper maintenance to ensure its longevity and appearance. In this comprehensive guide, we will explore everything you need to know about cultured stone maintenance, including cleaning, sealing, and repairing techniques. Understanding Cultured Stone Before delving into maintenance practices, it is essential to understand what cultured stone is and how it differs from natural stone. Cultured stone is made by replicating the look and feel of natural stone through a mixture of lightweight concrete, pigments, and aggregates. The manufacturing process allows for a wide range of colors, shapes, and textures, making cultured stone a versatile option for enhancing the aesthetic appeal of homes and buildings. Cultured stone offers several advantages over natural stone, including lower cost, easier installation, and consistent quality. However, despite its durability and resistance to weathering, cultured stone is not maintenance-free. Over time, exposure to environmental elements, such as sunlight, rain, and pollutants, can cause dirt, mold, mildew, and other contaminants to accumulate on the surface of the stone, detracting from its appearance and potentially compromising its integrity. Cleaning Cultured Stone Regular cleaning is essential to preserve the beauty and longevity of cultured stone. Depending on the location and condition of the stone, different cleaning methods may be required. Here are some general guidelines for cleaning cultured stone: 1. Routine Cleaning: – Use a soft-bristle brush or a cloth to remove dust, dirt, and debris from the surface of the stone. – Mix warm water with a mild detergent or a specialized stone cleaner to create a gentle cleaning solution. – Apply the cleaning solution to the stone using a sponge or a soft brush, working in small sections. – Rinse the stone thoroughly with clean water to remove any residue. – Allow the stone to dry completely before applying any sealant or protective coating. 2. Stain Removal: – For stubborn stains or discoloration, use a poultice made of baking soda and water to absorb the stain. – Apply the poultice to the stained area and cover it with plastic wrap to prevent drying. – Allow the poultice to sit for 24-48 hours before removing it and rinsing the area with water. – Repeat the process if necessary until the stain is fully removed. 3. Mold and Mildew Removal: – Mix equal parts of water and white vinegar in a spray bottle. – Spray the solution onto the affected areas of the stone and let it sit for 15-20 minutes. – Scrub the mold or mildew with a brush or sponge, then rinse the stone with water. – To prevent mold and mildew growth, ensure proper ventilation and drainage around the stone. Sealing Cultured Stone Sealing cultured stone is an important step in maintaining its appearance and protecting it from damage. A high-quality sealer can help repel water, oil, and other contaminants, preventing them from penetrating the stone and causing stains or discoloration. Here are some tips for sealing cultured stone effectively: 1. Choose the Right Sealer: – Select a sealer specifically designed for use on cultured stone, such as a penetrating sealer or a topical sealer. – Consider the type of finish you want to achieve, whether matte, satin, or glossy, when choosing a sealer. 2. Prepare the Stone Surface: – Clean the stone thoroughly to remove any dirt, debris, or stains before applying the sealer. – Allow the stone to dry completely to ensure proper adhesion of the sealer. 3. Apply the Sealer: – Follow the manufacturer's instructions for the application of the sealer, including the number of coats and drying times. – Use a brush, roller, or sprayer to apply the sealer evenly to the stone surface. – Work in small sections to ensure complete coverage and avoid streaks or blotches. 4. Allow for Curing: 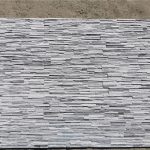 – Let the sealer dry and cure according to the manufacturer's recommendations before exposing the stone to moisture or heavy traffic. – Avoid touching or moving objects on the sealed stone surface until the sealer has fully cured. Repairing Cultured Stone Despite proper maintenance, cultured stone may develop cracks, chips, or other damage over time. It is essential to address any issues promptly to prevent further deterioration and maintain the structural integrity of the stone. Here are some common repair techniques for cultured stone: 1. Patching: – For small cracks or chips, use a high-quality stone patching compound to fill in the damaged areas. – Follow the manufacturer's instructions for preparing and applying the patching compound, ensuring a smooth and even finish. 2. Replacement: – If a larger section of cultured stone is damaged beyond repair, consider replacing the affected stones with new ones. – Match the color, shape, and texture of the replacement stones to the existing ones to maintain a cohesive look. 3. Repointing: – Over time, the mortar joints between cultured stone may deteriorate or become loose. – Repointing involves removing the old mortar and replacing it with fresh mortar to strengthen the joints and prevent water infiltration. Conclusion Proper maintenance is essential for preserving the beauty and longevity of cultured stone. By following the cleaning, sealing, and repairing techniques outlined in this guide, you can ensure that your cultured stone remains in top condition for years to come. Remember to inspect the stone regularly, address any issues promptly, and consult a professional if necessary for complex repairs. With the right care and attention, your cultured stone will continue to enhance the aesthetic appeal of your home or building for generations to come.